


通过 Inductor 使用 Intel GPU 后端的 PyTorch 2 导出量化
作者: Yan Zhiwei, Wang Eikan, Zhang Liangang, Liu River, Cui Yifeng
前置条件
PyTorch 2.7 或更高版本
简介
本教程介绍了 XPUInductorQuantizer,旨在为 Intel GPU 上的推理服务量化模型。XPUInductorQuantizer 使用 PyTorch 导出量化流程并将量化模型降低到 Inductor。
PyTorch 2 导出量化流程使用 torch.export 捕获模型到图中,并在 ATen 图的基础上执行量化转换。这种方法预计具有显著更高的模型覆盖率、更好的可编程性,以及简化的用户体验。TorchInductor 是一个编译器后端,将 TorchDynamo 生成的 FX 图转化为优化的 C++/Triton 内核。
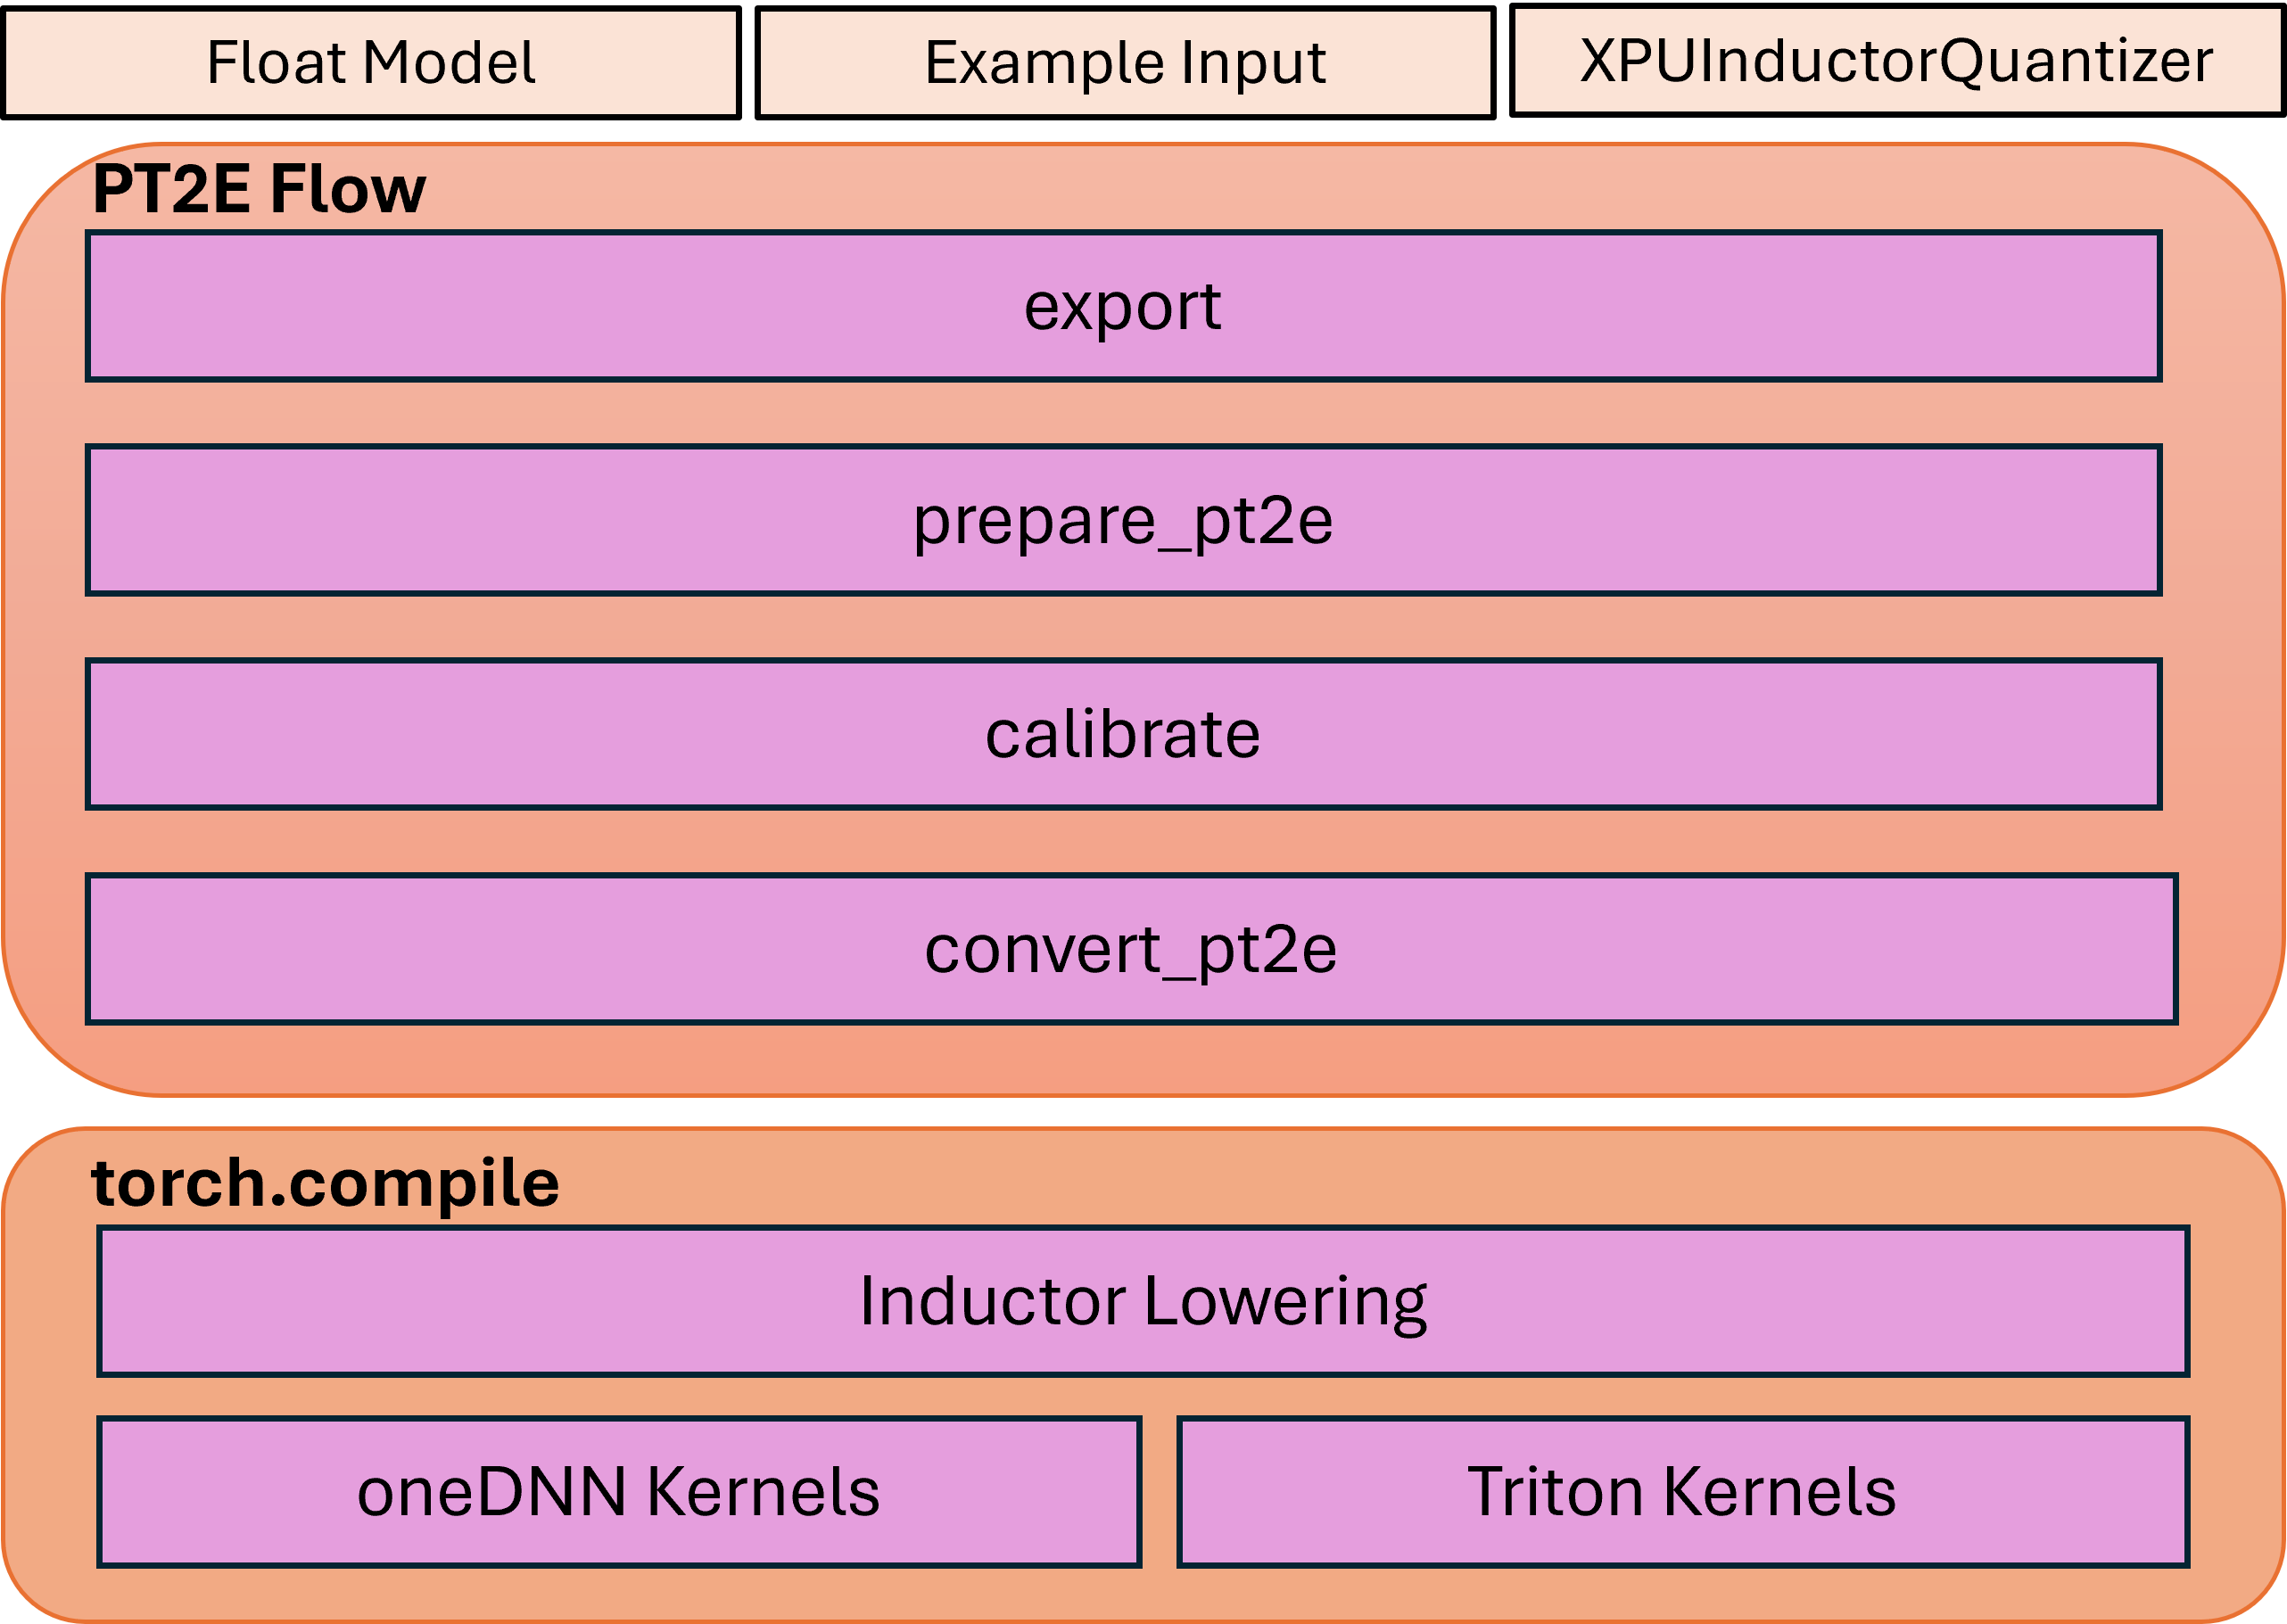
量化流程共有三个步骤:
步骤 1:基于 torch export 机制 从即时模式模型中捕获 FX 图。
步骤 2:基于捕获的 FX 图应用量化流程,包括定义特定后端量化器、生成带观察者的准备模型、执行准备模型的校准,以及将准备模型转换为量化模型。
步骤 3:使用
torch.compileAPI 将量化模型降低到 Inductor,该 API 会调用 Triton 内核或 oneDNN GEMM/卷积内核。
该流程的高级架构可以如下图所示:
后训练量化
目前我们仅支持静态量化方法。
建议通过Intel GPU通道安装以下依赖项:
pip3 install torch torchvision torchaudio pytorch-triton-xpu --index-url https://download.pytorch.org/whl/xpu
请注意,由于Inductor的``freeze``功能尚未默认开启,您需要使用``TORCHINDUCTOR_FREEZING=1``运行您的示例代码。
例如:
TORCHINDUCTOR_FREEZING=1 python xpu_inductor_quantizer_example.py
1. 捕获 FX 图
我们将从必要的导入开始,从动态模块中捕获 FX 图。
import torch
import torchvision.models as models
from torch.ao.quantization.quantize_pt2e import prepare_pt2e, convert_pt2e
import torch.ao.quantization.quantizer.xpu_inductor_quantizer as xpuiq
from torch.ao.quantization.quantizer.xpu_inductor_quantizer import XPUInductorQuantizer
from torch.export import export_for_training

# Create the Eager Model
model_name = "resnet18"
model = models.__dict__[model_name](weights=models.ResNet18_Weights.DEFAULT)

# Set the model to eval mode
model = model.eval().to("xpu")

# Create the data, using the dummy data here as an example
traced_bs = 50
x = torch.randn(traced_bs, 3, 224, 224, device="xpu").contiguous(memory_format=torch.channels_last)
example_inputs = (x,)

# Capture the FX Graph to be quantized
with torch.no_grad():
    exported_model = export_for_training(
        model,
        example_inputs,
    ).module()
接下来,我们将对FX模块进行量化。
2. 应用量化
在获取FX模块后,我们将导入用于Intel GPU的后端量化器,并将其配置为对模型进行量化。
quantizer = XPUInductorQuantizer()
quantizer.set_global(xpuiq.get_default_xpu_inductor_quantization_config())
``XPUInductorQuantizer``中的默认量化配置使用有符号的8位表示激活和权重。张量使用每张量量化,而权重则是有符号的8位按通道量化。
可选地,除了默认的使用非对称量化激活的量化配置,还支持有符号的8位对称量化激活,这可能提供更好的性能。
from torch.ao.quantization.observer import HistogramObserver, PerChannelMinMaxObserver
from torch.ao.quantization.quantizer.quantizer import QuantizationSpec
from torch.ao.quantization.quantizer.xnnpack_quantizer_utils import QuantizationConfig
from typing import Any, Optional, TYPE_CHECKING
if TYPE_CHECKING:
    from torch.ao.quantization.qconfig import _ObserverOrFakeQuantizeConstructor
def get_xpu_inductor_symm_quantization_config():
    extra_args: dict[str, Any] = {"eps": 2**-12}
    act_observer_or_fake_quant_ctr = HistogramObserver
    act_quantization_spec = QuantizationSpec(
        dtype=torch.int8,
        quant_min=-128,
        quant_max=127,
        qscheme=torch.per_tensor_symmetric,  # Change the activation quant config to symmetric
        is_dynamic=False,
        observer_or_fake_quant_ctr=act_observer_or_fake_quant_ctr.with_args(
            **extra_args
        ),
    )

    weight_observer_or_fake_quant_ctr: _ObserverOrFakeQuantizeConstructor = (
        PerChannelMinMaxObserver
    )

    weight_quantization_spec = QuantizationSpec(
        dtype=torch.int8,
        quant_min=-128,
        quant_max=127,
        qscheme=torch.per_channel_symmetric, # Same as the default config, the only supported option for weight
        ch_axis=0,  # 0 corresponding to weight shape = (oc, ic, kh, kw) of conv
        is_dynamic=False,
        observer_or_fake_quant_ctr=weight_observer_or_fake_quant_ctr.with_args(
            **extra_args
        ),
    )

    bias_quantization_spec = None  # will use placeholder observer by default
    quantization_config = QuantizationConfig(
        act_quantization_spec,
        act_quantization_spec,
        weight_quantization_spec,
        bias_quantization_spec,
        False,
    )
    return quantization_config

# Then, set the quantization configuration to the quantizer.
quantizer = XPUInductorQuantizer()
quantizer.set_global(get_xpu_inductor_symm_quantization_config())
在导入特定后端的量化器后,为后训练量化准备模型。``prepare_pt2e``将``BatchNorm``运算符折叠到前面的Conv2d运算符中,并在模型中的适当位置插入观察器。
prepared_model = prepare_pt2e(exported_model, quantizer)
(仅适用于静态量化)当观察器被插入模型后,对``prepared_model``进行校准。
# We use the dummy data as an example here
prepared_model(*example_inputs)

# Alternatively: user can define the dataset to calibrate
# def calibrate(model, data_loader):
#     model.eval()
#     with torch.no_grad():
#         for image, target in data_loader:
#             model(image)
# calibrate(prepared_model, data_loader_test)  # run calibration on sample data
最后,将校准后的模型转换为量化模型。``convert_pt2e``接收一个校准模型并生成一个量化模型。
converted_model = convert_pt2e(prepared_model)
完成上述步骤后,量化流程即告完成,量化模型已可用。
3. 降低至 Inductor
然后量化模型将被降低到Inductor后端。
with torch.no_grad():
    optimized_model = torch.compile(converted_model)

    # Running some benchmark
    optimized_model(*example_inputs)
在更高级的场景中,会涉及到int8混合bf16的量化。在这种情况下,当缺少后续量化节点时,卷积或GEMM运算符将输出BFloat16而不是Float32。随后,BFloat16张量将在后续逐点运算符中无缝传播,有效减少内存使用并可能提高性能。此功能的使用与常规BFloat16自动类型转换类似,只需将脚本包装在BFloat16自动类型转换上下文中即可。
with torch.amp.autocast(device_type="xpu", dtype=torch.bfloat16), torch.no_grad():
        # Turn on Autocast to use int8-mixed-bf16 quantization. After lowering into indcutor backend,
        # For operators such as QConvolution and QLinear:
        # * The input data type is consistently defined as int8, attributable to the presence of a pair
        #    of quantization and dequantization nodes inserted at the input.
        # * The computation precision remains at int8.
        # * The output data type may vary, being either int8 or BFloat16, contingent on the presence
        #   of a pair of quantization and dequantization nodes at the output.
        # For non-quantizable pointwise operators, the data type will be inherited from the previous node,
        # potentially resulting in a data type of BFloat16 in this scenario.
        # For quantizable pointwise operators such as QMaxpool2D, it continues to operate with the int8
        # data type for both input and output.
        optimized_model = torch.compile(converted_model)

        # Running some benchmark
        optimized_model(*example_inputs)
总结
在本教程中,我们学习了如何利用``XPUInductorQuantizer``对模型进行后训练量化,以便在Intel GPU上推理,利用PyTorch 2的导出量化流程。我们涵盖了捕获FX图、应用量化以及使用``torch.compile``将量化模型降低到Inductor后端的分步骤过程。此外,我们还探讨了使用int8混合bf16量化以提高内存效率和可能的性能提升的好处,尤其是在使用``BFloat16``自动类型转换时。
