


如何在Windows CPU/XPU上使用``torch.compile``
作者: Zhaoqiong Zheng, Xu, Han
简介
TorchInductor是新的编译器后端,将TorchDynamo生成的FX图编译为优化的C++/Triton内核。
本教程介绍了在Windows CPU/XPU上通过``torch.compile``使用TorchInductor的步骤。
软件安装
现在,我们将向您讲解如何在Windows CPU/XPU上使用``torch.compile``的逐步教程。
安装编译器
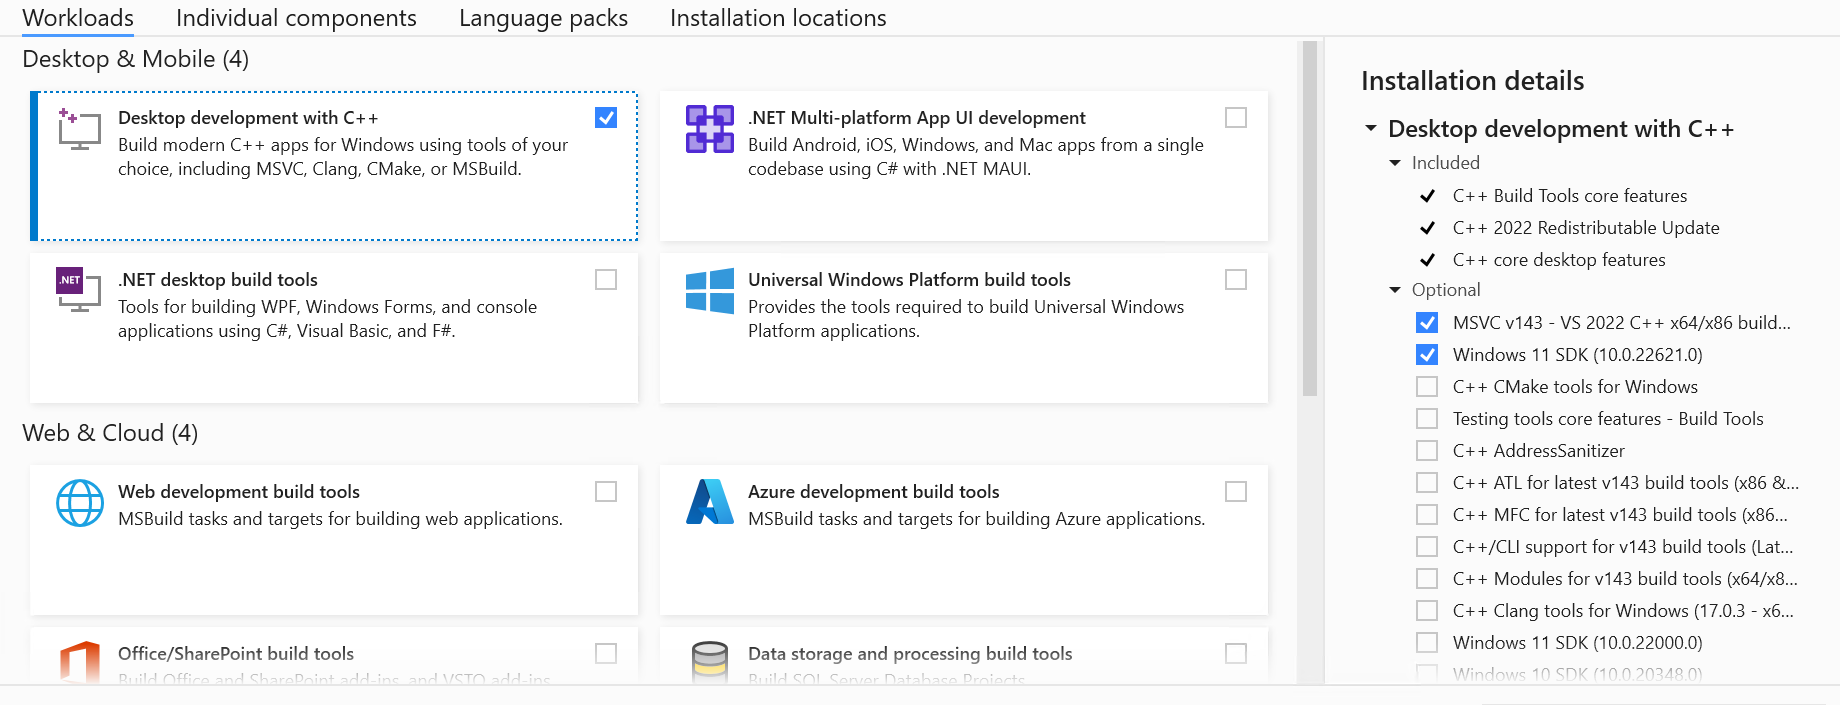
TorchInductor优化需要C++编译器,这里以Microsoft Visual C++ (MSVC)为例。
下载并安装`MSVC <https://visualstudio.microsoft.com/downloads/>`_。
安装时,选择**工作负载**,然后选择**桌面与移动应用**。勾选**使用C++进行桌面开发**并安装。
备注
Windows CPU Inductor还支持C++编译器`LLVM Compiler <https://github.com/llvm/llvm-project/releases>`_和`Intel Compiler <https://www.intel.com/content/www/us/en/developer/tools/oneapi/dpc-compiler-download.html>`_以获得更好的性能。请参考`提高CPU性能的替代编译器 <#alternative-compiler-for-better-performance>`_。
设置环境
接下来,让我们配置我们的环境。
通过cmd.exe打开命令行界面。
通过以下命令激活``MSVC``::
"C:/Program Files/Microsoft Visual Studio/2022/Community/VC/Auxiliary/Build/vcvars64.bat"创建并激活虚拟环境::
安装`PyTorch 2.5版本 <https://pytorch.org/get-started/locally/>`_或更高版本以使用CPU。欲使用XPU,请通过`Intel GPU入门指南 <https://pytorch.org/docs/main/notes/get_start_xpu.html>`_安装PyTorch 2.7或更高版本。
以下是如何在Windows上使用TorchInductor的示例:
import torch
device="cpu" # or "xpu" for XPU
def foo(x, y):
    a = torch.sin(x)
    b = torch.cos(x)
    return a + b
opt_foo1 = torch.compile(foo)
print(opt_foo1(torch.randn(10, 10).to(device), torch.randn(10, 10).to(device)))
以下是上述示例的输出::
tensor([[-3.9074e-02,  1.3994e+00,  1.3894e+00,  3.2630e-01,  8.3060e-01,
        1.1833e+00,  1.4016e+00,  7.1905e-01,  9.0637e-01, -1.3648e+00],
        [ 1.3728e+00,  7.2863e-01,  8.6888e-01, -6.5442e-01,  5.6790e-01,
        5.2025e-01, -1.2647e+00,  1.2684e+00, -1.2483e+00, -7.2845e-01],
        [-6.7747e-01,  1.2028e+00,  1.1431e+00,  2.7196e-02,  5.5304e-01,
        6.1945e-01,  4.6654e-01, -3.7376e-01,  9.3644e-01,  1.3600e+00],
        [-1.0157e-01,  7.7200e-02,  1.0146e+00,  8.8175e-02, -1.4057e+00,
        8.8119e-01,  6.2853e-01,  3.2773e-01,  8.5082e-01,  8.4615e-01],
        [ 1.4140e+00,  1.2130e+00, -2.0762e-01,  3.3914e-01,  4.1122e-01,
        8.6895e-01,  5.8852e-01,  9.3310e-01,  1.4101e+00,  9.8318e-01],
        [ 1.2355e+00,  7.9290e-02,  1.3707e+00,  1.3754e+00,  1.3768e+00,
        9.8970e-01,  1.1171e+00, -5.9944e-01,  1.2553e+00,  1.3394e+00],
        [-1.3428e+00,  1.8400e-01,  1.1756e+00, -3.0654e-01,  9.7973e-01,
        1.4019e+00,  1.1886e+00, -1.9194e-01,  1.3632e+00,  1.1811e+00],
        [-7.1615e-01,  4.6622e-01,  1.2089e+00,  9.2011e-01,  1.0659e+00,
        9.0892e-01,  1.1932e+00,  1.3888e+00,  1.3898e+00,  1.3218e+00],
        [ 1.4139e+00, -1.4000e-01,  9.1192e-01,  3.0175e-01, -9.6432e-01,
        -1.0498e+00,  1.4115e+00, -9.3212e-01, -9.0964e-01,  1.0127e+00],
        [ 5.7244e-04,  1.2799e+00,  1.3595e+00,  1.0907e+00,  3.7191e-01,
        1.4062e+00,  1.3672e+00,  6.8502e-02,  8.5216e-01,  8.6046e-01]])
提高CPU性能的替代编译器
为了提高Windows CPU上Inductor的性能,您可以使用Intel Compiler或LLVM Compiler。然而,它们依赖于Microsoft Visual C++ (MSVC)的运行时库。因此,第一步应该是安装MSVC。
Intel Compiler
下载并安装适用于Windows版本的`Intel Compiler <https://www.intel.com/content/www/us/en/developer/tools/oneapi/dpc-compiler-download.html>`_。
通过环境变量``set CXX=icx-cl``设置Windows Inductor编译器。
LLVM Compiler
下载并安装`LLVM Compiler <https://github.com/llvm/llvm-project/releases>`_并选择win64版本。
通过环境变量``set CXX=clang-cl``设置Windows Inductor编译器。
总结
在本教程中,我们介绍了如何在Windows CPU上使用PyTorch 2.5或更高版本,以及在Windows XPU上使用PyTorch 2.7或更高版本的Inductor。我们还可以使用Intel Compiler或LLVM Compiler在CPU上获得更好的性能。
